 [Photographs
© 2001 D. M. Dubé, Ken Warren][Photographs
© 2001 D. M. Dubé, Ken Warren]
[Photographs
© 2001 D. M. Dubé, Ken Warren][Photographs
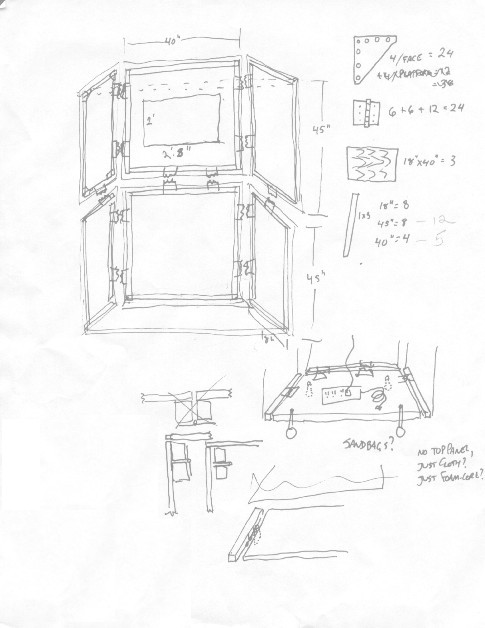
© 2001 D. M. Dubé, Ken Warren]The monolith was fairly easy to design, and would have been much easier to build if the wood I'd gotten was straight. But it was late, and I took whatever wood I could get. So it's all a little crooked, though it's really hard to tell from the stage. The design (click here for a grainy copy of the last paper design I did) was a result of the materials I had to work with, and the constraints of our working space.
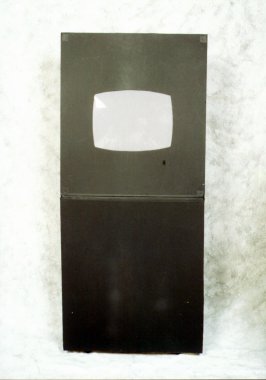
Very early on I decided that black-on-black foam-core board was the perfect material to do the face of the monolith. At our local Pearl Art & Craft, we found huge sheets of it - 40"x60". So I decided I would make the main face 40x90 (that's 7'6" tall), and make the sides anywhere from 10" (the correct depth) to 20" (a much more stable depth). This meant, though, that I could not have a single sheet of foam core run the entire front. It was also just 2 inches taller than our apartment, which would have made construction inconvenient at best. So I decided to build it in two basically identical sections.
Each section stands 45 inches tall, 40 inches wide, and has two hinged wings that stand 18" wide. 18" seemed a reasonable size, and it still looks decent enough. Since the audience only saw it from the front, they mostly had no idea how deep it was. I made ample use of hinges not only for the wings, that are supposed to fold, but to join the sections together rigidly - because a hinge is not just something to allow a bend. If you buy hinges that have removeble pins, you can use them as fasteners, and orient them so they don't bend.
Each of the vertical sections also had a removable shelf at the bottom, attached by hinges. The bottom section's shelf had four castors put in to make moving it easier, and mounting screws to attach a UPS. The top shelf was originally going to hold the disco ball, but we later decided the orientation was wrong, so the shelf would up just being for stability.
I cut the foam-core pieces early on, so I'd have them whenever I wanted them. For the TV, I got some plexi glass, and Donna scared up some grey fabric to back it with. The TV opening, then, was defined to be "just smaller than the plexi-glass," which was, I think, 18x24. To make it more evocative of TV, I drew some 42"-radius arcs across the edges, and cut the curved lines instead of the rectangles. I glued the plastic to the back of the foam-core, and then the fabric to the plastic.
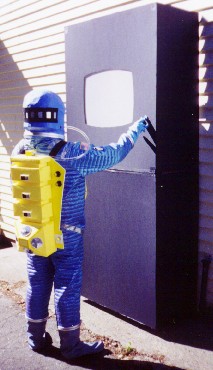
I also put in a cross-bar on the top section, about 7' up, for still more added stability. But as we were testing out the disco ball, we discovered that it looked best if it was pointing sideways, straight out the TV panel. So the possibly superfluous structural cross-bar got moved down a foot and became the mounting point for the disco ball. We duct taped the ball to the wood, and it held pretty well.
I also bought a replacement power switch for the ball: one that could be more easily turned on by a gorilla in a space suit wearing gloves. I cut a hole in the foam core just below the screen for it, and spliced it into the power cable for the ball.
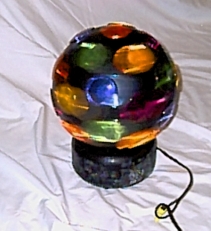 The disco ball,
by the way, was projective rather than a mirror-ball (a "Big Ball Of Lite"
by Lite F/X). It has a 25W bulb in it, a bunch of colored, plastic
lenses, and a rotating housing. Switch it on, and you have a bunch
of multicolored blobs traveling in a circle. I was worried that it
would get washed out by the spot lights, but I'm told it worked well.
Because it worked on 110V standard power, I needed to find a portable power
source. After asking people who know these things, I finally had
to buy a $50 UPS (a computer battery-backup). I had a friend at work
remove the transducer so it would stop beeping when it lost power (which
would be during the entire presentation), and anchored it to the bottom
shelf. The disco ball's power cable ran from the UPS, up one the
of the frame boards, through the switch on the front face, and to the ball
itself on the cross bar.
The disco ball,
by the way, was projective rather than a mirror-ball (a "Big Ball Of Lite"
by Lite F/X). It has a 25W bulb in it, a bunch of colored, plastic
lenses, and a rotating housing. Switch it on, and you have a bunch
of multicolored blobs traveling in a circle. I was worried that it
would get washed out by the spot lights, but I'm told it worked well.
Because it worked on 110V standard power, I needed to find a portable power
source. After asking people who know these things, I finally had
to buy a $50 UPS (a computer battery-backup). I had a friend at work
remove the transducer so it would stop beeping when it lost power (which
would be during the entire presentation), and anchored it to the bottom
shelf. The disco ball's power cable ran from the UPS, up one the
of the frame boards, through the switch on the front face, and to the ball
itself on the cross bar.
The wooden frames for the sections are composed of nearly 80 feet of 2x2 board, bolted into rectangles and hinged together. Instead of using the removable pins that came with the hinges, I bought a dozen hitch pins (also called R-clips), which have a large loop at one end of the pin, which makes pulling them out much easier. We decided not to attach the foam core to the frame at home, though, since it was 400 miles from home to Balticon, and we didn't want anything resting on them. So the frames went in the bottom of the van, and the foam core sat lightly on top of the pile. For WorldCon, we'd already glued the monolith together, and couldn't very well take it apart. So we transported it as gingerly as we could, and filled in any discolorations with a clack Sharpie.
Assembling the frames was really quite easy, but it turned out that attaching the foam core was harder. We bought wood-specific hot glue to attach the pieces, but I had so much area to cover that it was cooling before I could get the foam-core applied. After much consternation, Donna went and found another costumer, who was building sets for a play that night, and borrowed a bunch of screws from him. Then she found the Tech Director and bummed some black gaffer's tape from him. I then screwed the panels in, and covered the screws with little squares of gaffer's tape. And since the warped wood never quite lay flat, there were gaps in the foam core between the top and bottom sections. I covered those in gaffer's tape, too. Up close, it was obviously tape, but like so many other elements, from 20 feet away, it looked great. Seamless, matte and black.
For Balticon, we brought it to the ballroom after the Guest of Honor speech, and had it set up in minutes. The stage ninjas knew how to move it (it was a lot more stable than I was prepared to give it credit for), and brought it safely on stage three and a half hours later for my presentation. I switched it on as part of the presentation, and when I left the stage, the ninjas switched it off and put it right back where they found it. Perfect.
For WorldCon, we stored it just off-stage before the show, and the ninjas brought it on stage right before my entrance. They then carried it off-stage after me, which was great - I could roll it right back to the green room for official photography.
Finally, I have the very last element I made, the gorilla mask. Continue on to the mask.